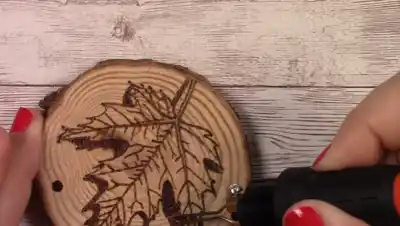
Start with a clear outline
Need an outline to start with? Our free pyrography downloads include traceable designs and beginner practice sheets. Choose a sheet, check its size against your blank and use one of the transfer methods below.
A transferred design gives you guide lines to follow with your pyrography pen. Choose a method that suits the picture and the wood, then test it on scrap before marking the finished piece.
Use smooth, unfinished wood. Do not burn painted, stained or pressure-treated surfaces. Remove paper, tape and templates before using the hot pen.
Method 1: Transfer paper
Use it for: Printed designs, lettering and detailed outlines.
PSLER black transfer paper is supplied as thirty A4 sheets and lists wood among its intended surfaces. Test its marks and how easily they erase on your wood. Do not assume every paper labeled carbon or graphite behaves the same way.
- Print your design at its final size and check how it fits on the blank.
- Tape one edge of the design to the wood to make a hinge.
- Slide the transfer sheet underneath, with its marking side facing the wood.
- Trace a short line with light pressure, then lift a corner to check the result.
- Trace the remaining outlines. Keep the taped edge attached while checking for missing lines.
- Remove both sheets and the tape before burning.
A colored ballpoint pen helps you see which printed lines you have traced. Reuse the transfer sheet while it still makes clear marks; there is no fixed number of uses.
Method 2: Pencil-backed paper
Use it for: A transfer when you already have a printout and a graphite pencil.
- Turn the printout over and shade the areas behind your design with a soft graphite pencil.
- Place it graphite-side down on the wood and tape one edge in position.
- Trace the design from the front with a pen or sharp pencil.
- Lift a corner to check the outline. Add graphite to the back if any areas fail to transfer.
- Remove the paper and lightly clarify any incomplete guide lines.
You only need to shade behind the lines you want to copy. Keep the graphite layer even and avoid pressing so hard that you dent the wood.
Method 3: Draw directly on the wood
Use it for: Simple outlines, loose landscapes and designs you are comfortable drawing.
- Mark the center and main shapes lightly in pencil.
- Check the proportions before adding small details.
- Erase unwanted construction lines while the wood is still unburned.
- Keep only the marks you need to guide your burning.
You can combine methods: transfer the main subject, then sketch a simple background around it. For a new subject, practice the drawing on paper first.
Method 4: Trace through a stencil
Use it for: Repeating letters, borders or small motifs.
A cut-out stencil guides your pencil directly. Choose openings that fit your pencil tip and a motif that fits the usable area of the blank. Our stencil guide compares letter templates and pattern-transfer options.
- Mark a light baseline or center point for alignment.
- Hold the stencil securely and trace its openings with a fine pencil.
- Lift it to check the outline before placing the next repeat.
- Remove the stencil before following the marks with your pyrography pen.
Keep spacing consistent between repeats. Sheet dimensions do not tell you the size of each letter or motif.
Method 5: Trace on paper first
Use it for: Simplifying a photograph or separating the outline from background detail.
A lightbox or bright window can help you trace a reference onto thin paper. This prepares a paper pattern; it does not require light to pass through the wood.
- Place your reference behind a sheet of thin paper on the lightbox or window.
- Trace the main outlines and only the details you need.
- Check that the paper pattern fits your wood blank.
- Transfer the pattern using transfer paper or the pencil-backed method above.
For portraits, keep the original photograph nearby as a shading reference. The outline alone will not show all the changes in tone.
Choose a method for your project
| Project | Method | Why choose it |
|---|---|---|
| Detailed printed design | Transfer paper | Copies the outline at the printed size |
| A small design with basic supplies | Pencil-backed paper | Uses a printout and graphite pencil |
| Loose shapes or backgrounds | Direct drawing | Lets you adjust the design on the wood |
| Repeated letters or motifs | Stencil tracing | Repeats the same outline |
| A busy photo that needs simplifying | Trace on paper, then transfer | Separates the useful outline from background detail |
Check these before burning
- Surface: Sand the unfinished wood smooth and remove dust before marking it.
- Pressure: Start lightly. Heavy tracing can leave grooves and marks that are harder to erase.
- Alignment: Keep one taped edge attached until you have checked the entire outline.
- Tape: Test low-tack tape on scrap and remove it slowly; no tape is guaranteed to leave every surface unchanged.
- Visibility: Check your transferred lines in the light where you will work.
Common questions
Can I use carbon paper instead of graphite transfer paper?
Some transfer papers are sold using both names. Test the exact paper on scrap wood: check line visibility, smudging and erasing before using it on a finished piece.
How do I remove leftover pencil lines?
Try a clean eraser on dry, cool wood with light pressure. Test first and avoid rubbing so hard that you damage the surface. Remove unwanted guide marks before applying a finish.
Can I transfer onto a curved surface?
Work in small sections so the paper lies against the curve. Secure a reference point, check each section, and avoid folds across important lines. Do not cut or score paper while it rests on the finished wood.
What if the design is larger than one sheet?
Keep the full paper pattern aligned and move the transfer sheet beneath it in sections. Check each area before moving on. This avoids a thick overlap of transfer sheets under your tracing lines.
How do I scale a design to fit?
Measure the usable area of the blank, including space around edges and holes. Resize the design to those dimensions, print a test copy, and measure it before transferring.
Next, read our beginner’s guide for burning your outline, or our lettering guide for text projects.